
Calendar User Docmentation
1 Getting Started
2 Single Events and Repeating Events
3 Creating a Single Event
3.1 Firstly . . .
3.2 Event Description
3.3 Event Date (when time information is not required)
3.4 Event Date (when time information is required)
3.5 And Finally . . .
3.6 Using “Apply” instead of “Save”
4 Editing a Single Event
4.1 Firstly . . .
4.2 Edit
4.3 Copy and Edit
5 Deleting a Single Event
5.1 Firstly . . .
5.2 Delete
6 Unpublishing a Single Event
6.1 Firstly . . .
6.2 Unpublish
6.3 Republish
Creating, Editing, Deleting and Publishing your own events.
1 Getting Started
• Goto the Calendar Menu item and click on Login and then Login using the provided user and pass
• You will see the “Events Calendar” screen in “see by month” mode, displaying all published events.
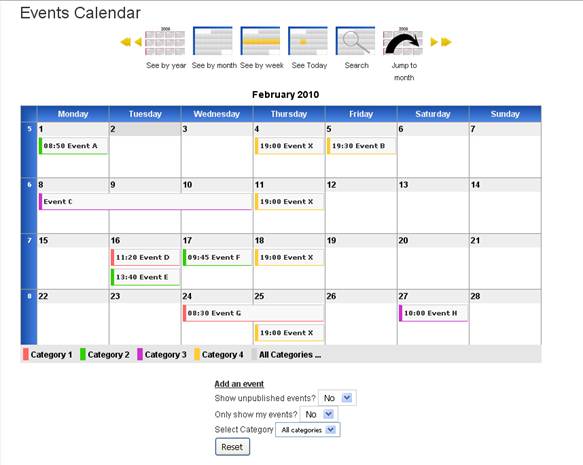
• The icons (“see by year” etc) and arrows near the top of the screen are self-explanatory.
Experiment by clicking on each icon, and for each icon clicking on each arrow.
• In any “see by ...” mode of the calendar, click on the name of an event to view more details
about it. Then click on “Back” underneath the details to return to the calendar.
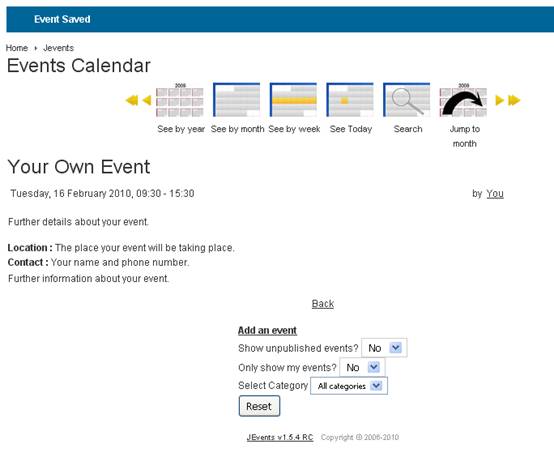
• There is a menu near the bottom of the screen. The “add an event” option is explained
fully in section 3 below. The other options are self-explanatory, but will make more sense in due course – however, feel free to experiment with them now!
2 Single Events and Repeating Events
• An event can either be “Single” or “Repeating”.
• A Single Event is a “one-off” event that occurs in the Events Calendar only once.
• A Single Event may take place over more than one consecutive day (in which case it can also be described as a “Multi-Day Event”).
• A Repeating Event is an event that occurs in the Events Calendar more than once at
regular intervals.
• Of course, in real life, it is possible to have an event happen more than once on an irregular basis, but in such a situation, each occurrence of the event would be classed as a Single Event.
• By the very nature of a Repeating Event, it is more complicated to create, edit, delete and publish than a Single Event.
• So it makes sense in these instructions to start with Single Events.
3 Creating a Single Event
3.1 Firstly . . .
• Go to the “see by month” mode of the “Events Calendar” screen.
• Then: either move your mouse over the relevant day and click on the “+” sign; or click on the “add an event” option in the menu underneath calendar.
• You will see the “Edit Event” screen.
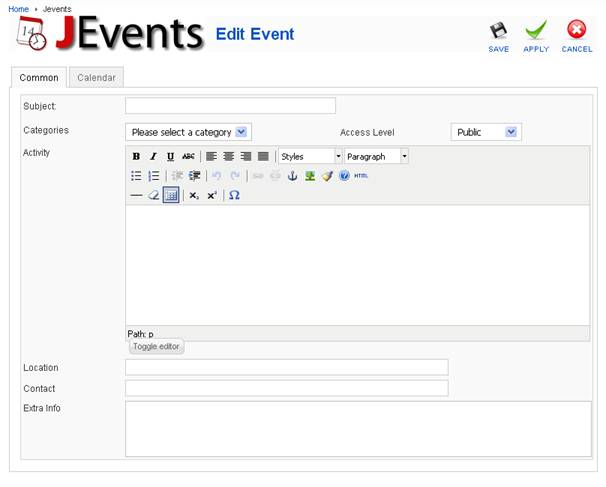
• There are two sets of information to provide, on two different forms:
• Event description on the “Common” form
• Event date and time on the “Calendar” form.
• The Event Description form is shown in the screen shot above, and the Event Date and
Time form is shown on the next page.
3.2 Event Description
.
• Click on the “Common” tab if shown.
• Enter the name of your event in the “Subject” field (mandatory).
• Select the appropriate category for your event from the “Category” drop-down menu
(mandatory).
• Select the required “Access Level” from the next drop-down menu (mandatory). This defines who will be able to see your event in the calendar after it's been published:
• “Public” means anyone visiting the site.
• “Registered” means logged-in users such as yourself.
• “Special” means only those who have permission to add articles to the site.
• Enter any other information in any of the other fields as required (not mandatory).
3.3 Event Date (when time information is not required)
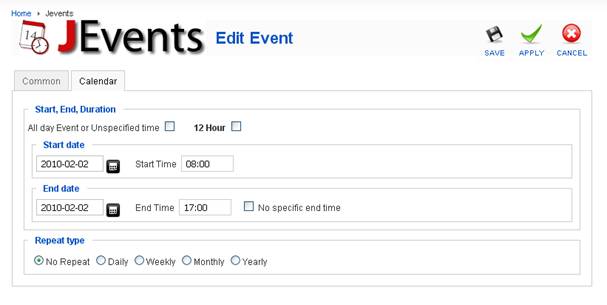
• Click on the “Calendar” tab if shown.
• Put a check in the “All day event or unspecified time” box.
• If your event is on just one day, enter that date under both “Start” and “End”.
• If your event lasts more than one day, enter the appropriate dates under “Start” and “End”, and a “Multi Day Event Treatment” option will appear automatically. “Yes” is self- explanatory, and “No” means your event will only appear in the calendar on the first day.
• Ensure “Repeat type” is set as “no repeat”.
3.4 Event Date (when time information is required)
• Click on the “Calendar” tab.
• Ensure the “All day event or unspecified time” box is unchecked.
• Times are always shown in the “Events Calendar” in “24-hour” format, but if you want to input the time as “12-hour”, check that box, which will give you “am” and “pm” options.
• Enter the appropriate dates and times under “Start” and “End”. If there is no specific end time, check the appropriate box.
• As in 3.3 above, the “Multi Day Event Treatment” option will appear if the start and end dates are different.
• Again, ensure “Repeat type” is set as “no repeat”.
3.5 And Finally . . .
• Once all the description and date/time information has been entered, click on “Save” at top of page
• You will return to the “Events Calendar” screen, but what you see on the screen depends on whether or not you have permission to publish.
• If you don't have permission to publish, you will see a message at the top of the screen saying “Your event has been saved and is under review ”. Note: you need to select “Yes” for the “Show unpublished events” option in the menu at the bottom, to see your event.
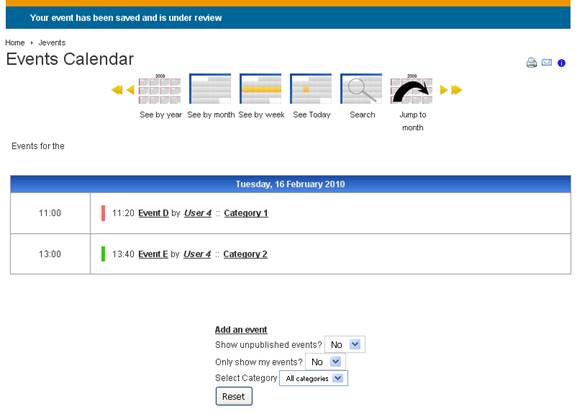
• This is another good point at which to experiment with the icons and arrows at the top, and the menu options at the bottom, of the “Events Calendar” screen. Also click on the name of your event to see all the details about it.
• If you do have permission to publish, you will see a message at the top of the screen saying
“Event Saved”, and the details of your own event.
3.6 Using “Apply” instead of “Save”
• In the top right hand corner of the “Edit Event”screen, there are three icons: “Save”, “Apply” and “Cancel”.
• If you have a lot of information to enter about an event, or if you are interrupted part way through entering information, then using “Apply” can be helpful.
• Clicking on “Apply” means that the information you have already entered will be saved, but instead of returning to the “Events Calendar” screen (as with “Save”), you remain in the “Edit Event” screen, and so can continue entering information.
4 Editing a Single Event
4.1 Firstly . . .
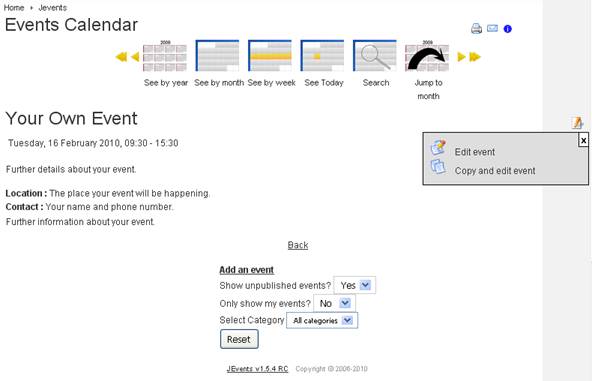
• Go to any “see by ...” mode of the “Events Calendar”, with the bottom menu options set appropriately, and click on the name of your event.
• You will see the event details screen.
• At the far right of the screen, there is an “Edit” icon (picture of a pencil and paper). Click on this icon, and an option menu will appear.
• The list of options in this menu will depend on what you are permitted to do on the system, but at the very least, there will be “Edit event” and “Copy and edit event”.
4.2 Edit
• Click on the “Edit event” option.
• You will see the “Edit Event” screen again, displaying all the information you entered when you first created (or last amended) your event.
• Click on the “Common” and/or “Calendar” tabs as appropriate and make any amendments you require.
• Once all the amendments have been made, click on “save”, and a pop-up box will appear
(about repeats and exceptions). Click on “OK”.
• From here onwards, everything will be the same as it was when you first created your event
(see section 3.5 above).
4.3 Copy and Edit
• This is a time-saving option and is useful when you want to create an event for which some of the information is the same as an existing event.
• Follow the steps in 4.1 and 4.2 above, except click on the “Copy and edit event” option instead of “Edit event”.
• With “Edit event”, the amended event replaces the original, ie the original event is deleted from the calendar.
• With “Copy and edit event”, the original event is kept in the calendar, while the amended event is added as another separate event to the calendar.
5 Deleting a Single Event
5.1 Firstly . . .
• Follow the steps in section 4.1 above.
• If there is no “delete” option in the menu, then you do not have permission to delete, in which case you can ignore this section!
• Otherwise, at the very least, the menu will contain “Delete event” as well as the two edit options mentioned in section 4.1.
5.2 Delete
• Click on the “Delete event” option.
• A pop-up box will appear to ensure you really do want to delete – if you do, click “OK”.
• You will return to the “see by month” mode of the “Events Calendar” screen, with a message at the top saying “Deleted”.
• You can see that your event has been deleted by setting the bottom menu options appropriately.
6 Unpublishing a Single Event
6.1 Firstly . . .
• If you do not have permission to publish (see section 3.5 above), then you can ignore this section!
• Follow the steps in section 4.1 above (unless you have just deleted your event, in which case you will need to create another one first!!).
• At the very least the menu will contain “Unpublish event” as well as the two edit options mentioned in section 4.1.
6.2 Unpublish
• Click on the “Unpublish event” option.
• You will return to the “see by month” mode of the “Events Calendar” screen, with a message at the top saying “new published state saved”.
• You can see that your event has been unpublished by setting the bottom menu options appropriately.
6.3 Republish
• To republish, follow the steps in section 4.1 again.
• This time the menu will contain “Publish event” instead of “Unpublish event”.
• Click on the “Publish event” option.
• You will return to the “see by month” mode of the “Events Calendar” screen, with a message at the top saying “new published state saved”.
